Tonight’s job was dedicated to a custom case for Raspberry PI. The main goal of this case is for my own favourite project: NetPi Scanner.
This case can be usefull for many other projects that I can make or even YOU. It uses 1 push button and 2 leds. By buying this case, you are ready to make something usefull with GPIO interface and 2 leds for playing. You don’t need to weld any wires or cut your fingers. Is plug’n’play.
In this box, PIN 7 and 14 are used for leds, PIN 22 is for the push button. So, with a little Python or Bash, you can easily build some responsiveness to your Pi – You can trigger anything with the button and make an action, send an email, reboot the Pi, enable or disable services, restart some script…. your imagination will rules. You even have 1 green led and a red one for visual alerts, services status, new emails, temperature alerts….. once again, just imagine.
The web interface for configuration is also with a new look, and getting better and better. This web interface is for NetPi Scanner, but you can easily change IP address, NetMask and Gateway and even reboot the Pi.
Raspberry PI continues to surprise us with the low cost solutions we can build by our own.
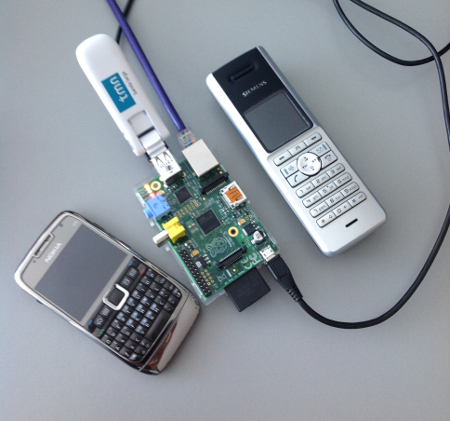
This time I have a PBX solution to avoid roaming costs between our office in Brasil and our headquarters in Portugal. This solution also works when people are traveling around europe (very usual) too.
So, basically I have a Raspberry PI running Asterisk and configured as a public PBX (security issues had been taken). I also have a Huawei E180 GSM modem to route outside or inside calls to landline or mobile phones or even internal extensions.
So, when people are traveling, they just open their favourite application for Android or iPhone trough wireless or 3G and call the desired number. The call is routed (free) trough internet and the raspberry just forward the call trough the GSM modem. So, the call is completly free because we have thousands of free minutes to use in our rate contrat.
The RFID is another technology that we can play and combine with the Raspberry PI. To get started with RFID/NFC, I just made a big improvment to my last project – NetPi Scanner – the USB network scanner. I’ve just replaced the push buttons with the RFID/NFC sensor.
At the begining, we could have one button for one e-mail address destination. I improved on another version for 3 to 5 buttons and all configurable through a web interface. Now, with RFID/NFC the possibilities of e-mail destinations are completely huge.
I have used a kit including 2 diferent tags. In this case, I have used this tags to identify diferent people. Each one with their own e-mail address. So I could replace the buttons to an infinite e-mail addresses acording to our needs.
The python script was a little bit modified. This way, the input is made with the RFID and their tags and not with the GPIO inputs (push buttons).
NetPi Scanner is a product born from the One Button Scan to E-mail – A Raspberry Pi solution developed from the need to provide the simplest interface to send scanned documents to an e-mail address. The first purpose to develop such solution was for people with lack of knowledge in the IT area.
Just a Raspberry Pi, an old scanner and a network – This is the perfect setup for a low cost solution and for people that are not used to IT.
NetPi Scanner is now improved, released with version 1.0, Five buttons and a web interface so you can setup the Mail settings, Destination e-mail addresses and Subject Lines for each button. There are a few internal changes on packages avoiding the use of bind.
As you can see in the picture, that was my first prototype board for testing. Like the original solution, there are 2 leds yet: One for system ready, the other one for system busy. A smaller board is now being developed.
I came across this idea because there is a problem in the company that I work for. There is a remote office that has only a few people working a few hours a day. For these people computers are still a “complicated” object. We have internet and a VPN there. We also have e-mail and a server for remote backups. However something was missing. We need an easy way to transfer paper documents to our headquarters instantly.
.
.
To Buy a network scanner was too expensive; to buy a simple scanner and attach it to a computer was not a solution either, because there are 3 computers to 3 people. Despite that, it will not be would be an easy task to use this software due to people lack of knowledge.
The solution: an old scanner and a Raspberry Pi.
I assume that you may have some network background for setting up an email server and Bind so you can configure your operating system to send email to any email account.
In this solution I used Raspbian for the OS, Sendmail, Bind, Python, Bash, Sane, Imagemagick and Mutt. I’ll skip the Sendmail and Bind details.
The idea is: atach an old USB scanner (must be compatible with Sane) to the Raspberry Pi, push a button to initiate the scanning process and a script is launched so the scanned image would be automatically sent to a predefined email address.
We have 2 leds for system status; I’ll be on headquarters and if the system fails, someone has to describe me, by phone what they see in the Raspberry Pi box.
So, let’s start by hardware: we will need 3 pins; one pin for the push button and two others for system status with leds.
System busy:
Pin 18 (RED) will be used to show that the system is performing is main task since the moment we’ll push the button to the moment that the image is processed, converted and sent.
Push button:
The button to trigger all the action. It will be conected to Pin 18 and a 10.000 omh resistor.
System status:
Pin 14 (GREEN) will be used to show the healthy system status by blinking twice every 5 seconds.
For that, I’ve used a simple Bash script that is called from /etc/rc.local on system boot. rc.local
#initiate PINS 14 and 18 on GPIO
echo 14 > /sys/class/gpio/export
echo out > /sys/class/gpio/gpio14/direction
echo 18 > /sys/class/gpio/export
echo out > /sys/class/gpio/gpio18/direction
#turns leds 14 and 18 off
echo 0 > /sys/class/gpio/gpio14/value
echo 0 > /sys/class/gpio/gpio18/value
#bash script to initiate blinking status
/root/scripts/blinking.sh &
# python script to listen for the push button
/root/scripts/script_listen_for_scan.py &
/root/scripts/script_listen_for_scan.py
#!/usr/bin/env python
from time import sleep
import os
import RPi.GPIO as GPIO
GPIO.setmode(GPIO.BCM)
GPIO.setup(23, GPIO.IN)
GPIO.setup(24, GPIO.IN)
while True:
if ( GPIO.input(23) == True ):
os.system(‘/root/scripts/scan.sh &’)
sleep(1);
/root/scripts/scan.sh (this script will make all the job, and is called trough the loop of script_listen_for_scan.py)
#!/bin/bash
cd /root
rm -rf /root/sent.lock # to ensure that if something goes wrong, next time system will not hang up because of this
echo 1 > /sys/class/gpio/gpio18/value # process initiated – let’s turn led RED on
scanimage –resolution 100 > /root/scan_job.pnm # scan and save the file
convert /root/scan_job.pnm /root/scan_job.jpg # convert to JPG
cd /root # ensure to run as root to avoid the mutt to not send the file
sudo mutt -s “Scan from Remote Office” -a /root/scan_job.jpg -c email@mydomain.com < /root/MSG # MSG contains a simple message.
echo 0 > /sys/class/gpio/gpio18/value # job completed – Turn RED led off.